

by:Aloicious
Thanks to: Lextech
Jan. 22, 2011
Please read the disclaimer page
Visit our FORUM. All discussion, questions and comments about this article are welcome, Click here.
What I’ll discuss today is something that not many people have done, or even heard about at this point, but has a lot of benefits and isn’t overly hard to do (though it is involved). I’m talking about how I removed the distributor and converted my SBC vortec L31 5.7L to using 8 separate LS2 coils in a coil per cylinder setup using EFIConnection’s 24x reluctor ring setup.
In my opinion, this is a great ignition system upgrade. It eliminates some major problematic things in the L31 setup (like completely removing the cap and rotor which caused a lot of problems for me in the past, as well as severely reducing dist gear wear associated problems like the dreaded P0300.), and offers exceptional control and reliability that blows any aftermarket ignition setup out of the water in my opinion. It also will allow you to run a double row timing chain if you want to (which is not an option on the L31 with the 4x crank reluctor) This can work on most any gen1 or gen1e small block chevy and even the gen2 LTx’s which is great because it eliminates the optispark crap. However each engine setup will change the requirements and installation slightly, so I’m only going to focus on my install, which is in a Gen1e L31 5.7L vortec 350. Any different setup, you’ll want to contact www.eficonnection.com for details.
Okay, now first off you may ask yourself, ‘Why switch to an LSx style ignition setup in a SBC? Why not just swap to an LSx engine?’ And you have brought up a great and valid point. An LSx swap may be preferable for many people. There is plenty of information on how to do so, and it shouldn’t be that hard depending on your current setup. LSx swaps are popular and do very well in GMT400’s. However there are some benefits to keeping the SBC too. For example Gen III engines (LS1, LQ4, LQ9, etc) produce great power, however it is much higher in the RPM range than a gen1e like mine, and I personally prefer a lower RPM power band which will provide more usable power in a daily driver situation. Secondly, LSx swaps, can get expensive, fast…now this is by no means a cheap upgrade, it absolutely is pricey, but with LSx swaps, you might have to look into things like serious transmission changes or full trans swaps, which may require driveline alterations, etc, that can add up quickly, this is like my setup, I run a T56 from a 1994 LT1 Fbody, if I did a LSx swap it would require some pretty severe trans modifications to work correctly, I wasn’t willing to do that. Also LSx swaps can require a lot of room to complete. When I did this swap, I had a small garage that wasn’t even big enough to fit my whole truck in and close the door, there was no way I could get the space needed for a cherry picker in there to pull/install the engine. No need to pull the engine or anything that intensive for this mod. Plus if you’ve already done some nice mods to your existing engine, why discard them all and start over with a different possibly non-compatible engine? There’s nothing wrong with working on what you have, after all, that is where true hot-rodding came from. Now, I do like LSx swaps, and if that looks better for you, then go for it. But for my situation, this was a better use of my time and money for my personal preferences.
Required supporting mods:
Okay, to do this you have to have a few things. First off, this requires a 12200411 PCM. No getting around it, period. I had this done about a year prior to installing the 24x setup. Installing the 411 combined with EFILive is by far the best mod I have ever done. Tuning your own vehicle is very satisfying and will teach you more about your vehicle than you could ever imagine. To research a 411 PCM swap, please read here: http://www.pacificp.com/forum/viewtopic.php?t=3240 I know its long, and there are a lot of tangents that pop up, but read it, it will answer most/all of your questions about the 411 swap. You can also read the 411 swap article here on GM Truck central once it is completed.
I’m not going to go over how to swap the 411, that is well covered elsewhere. But understand that it IS a requirement for this mod. Plus you will need some way to tune your new setup. This could be done in a number of ways, including going through a dyno tune, mail order tune, whatever. However in my experience the best and ideal way to get what you want and nail everything down correctly, especially with a very custom and not widely run setup like this, is to do the tuning yourself. I use EFILive and love it and highly recommend it, there are also other tuning suites out there which will work too, like HP tuners, and Tunercats II, all great software, I have limited experience with software other than EFILive, so do your own research to find out what is best for you.
Now, what you need to get are the following:
-8 LSx coils, (I used LS2 coils)
-24x reluctor wheel from eficonnection
-24x crankshaft sensor (this sensor is available from eficonnection, but the sensor itself is the same as the ones from an L21 truck engine if you want to shop around for it)
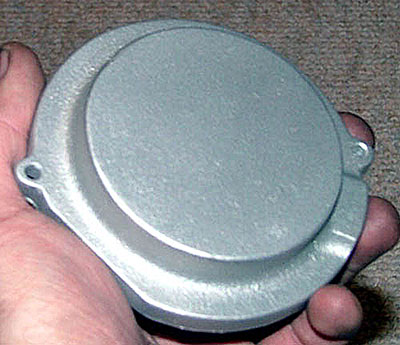
-Distributor cover for your L31 vortec distributor
-New plug wires
-A way to mount the new coils
-Wiring harness for the separate coils to connect them to the PCM/power/etc
-New timing cover (technically the original L31 timing cover is a one use only item and should be replaced, you can attempt to re-seal it, but realize you may end up with leaks) if you get a new cover, make sure you get one WITH the sensor hole in it, I ordered one from summit and it arrived, was identical to the stock one, except it didn’t have provisions for the crank sensor.
-And possibly LS1 A/C sensor/wiring
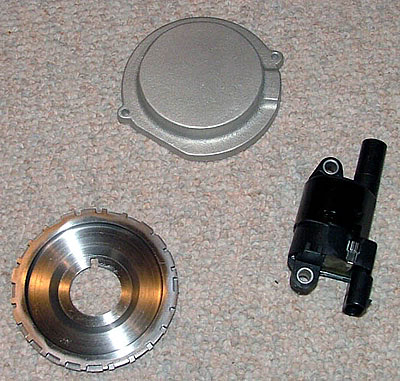
Here’s a pic of the 24x reluctor, sealed dist cap, and one LS2 coil from my setup:
Here is EFIconnection’s site for the 24x setup:
http://www.eficonnection.com/eficonnection/24x.aspx
They offer many of these needed parts, including the reluctor, LS2 coils, complete wiring harnesses, or do-it yourself wiring parts for all aspects of this mod, aluminum timing covers, crank sensor, distributor sealed cap, coil mounts, even PCM’s and connectors/wiring for that if you need it.
Here’s what I did, I got the 24x reluctor, crank sensor, sealed dist cap, coils, and all DIY wiring for the project from EFIconnection. As well as mounting setup for one half of it but I’ll discuss that later.
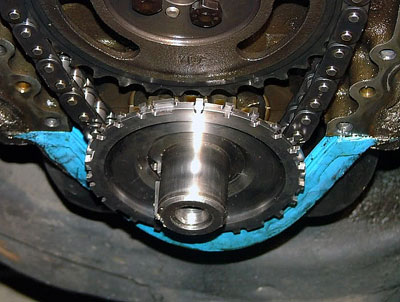
So in order to install the 24x reluctor, you have to strip down the front of the engine, take off things like the water pump, crank pulley and harmonic balancer, etc, basically everything in order to get to the timing cover and properly remove it. Some people need to also remove the oil pan to get the timing cover off too, so be aware of that. Once you get down to the cover, remove it. In there you’ll see the 4x crank reluctor, which looks like this:
You’ll need to pull it off the crankshaft, you might need a gear puller for this if the sucker is tight on there. Mine wasn’t too bad, I just gently used a pry bar to walk it off. Just be careful not to damage anything like the timing set/etc. After it is off, push on the 24x sensor in its place. Like this:
Once it’s on begin re-assembling everything, install the new 24x crank sensor into the timing cover, and it’s probably a good idea to wire for the new sensor now too, when I did it EFIconnection had a nifty little adapter that you just plug the old crank sensor connector into and it had about 2-3” of wiring attached to the new sensor connector which correctly rewired it. I don’t see it on their site right now, but I’m pretty sure they could get you one if you contact them about it.
If you want to just repin the connector, The pinouts for the 24x sensor are:
A-yellow wire for CKP sensor signal,
B-purple wire CKP low reference,
C-Pink wires CKP 12v reference
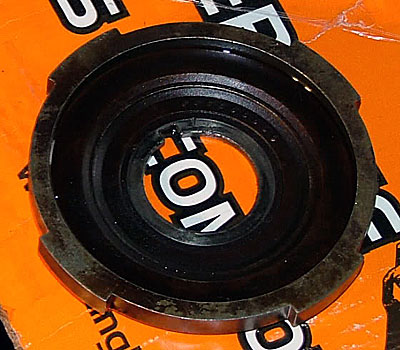
Okay, now that you have the new reluctor in, new 24x crank sensor in, and wired, and most everything re-assembled, let’s work on the coil setup, first off is to pull off the old cap and rotor (good riddance), old coil and ignition module, plug wires, and such. Although this swap removes the need to use the distributor to actually distribute the spark, you need to keep a distributor body installed in order to provide the cam sensor signal, and to keep that hole in the back of the intake manifold plugged up. If you’re not installing a different distributor body or anything, I would NOT recommend removing the distributor, just use the sealed dist. cap and install it on the dizzy. Here is the cap from EFIconnection, its very well made, GM does have a cap that was used on early transitional 7.4L engines but its plastic and VERY hard to find. I’d just get the aluminum one from EFIconnection if I were you. Here’s a pic of mine:
If you do remove the distributor for whatever reason, please read this about how to correctly re-stab it on page 2 here:
http://www.eficonnection.com/24x/doc...stallation.pdf
Now you want to figure out how to mount the coils. I used a few different methods, due to my setup, I have a large side mounted Whipple supercharger which covers a portion of the driver side valve cover and eliminates the ability to use the top of that valve cover for mounting, I ended up fabricating some little coil mounts ‘boats’ here:
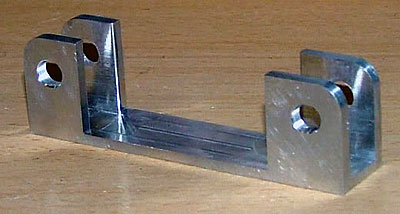
And mounting them off some angle aluminum welded to the side of some aluminum valve covers:
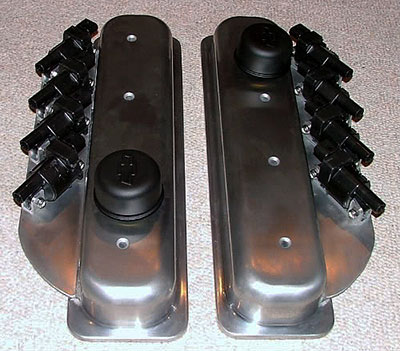
This worked great for the driver’s side, kept the coils back far enough to clear potential problems with the Whipple, etc, however the passenger side was problematic, I had issues with the oil dipstick tube clearance, and the ECT sensor wiring which I have in my passenger side head, as well as just making things more crowded over there when it didn’t need to be. After running it with that for a while, I ended up switching the passenger side over to the coil bracket that eficonnection makes which mounts the coils up on top of the valve cover and allows access to things like oil fill tubes and breathers/PCV:
It has worked great, if you don’t have portions of the valve covers inaccessible like I did, and you’re using the LS2 coils, I’d recommend just using EFIconnection’s brackets. But there are many other ways you can mount them. Here are some mounting ideas from their other customers:
http://www.eficonnection.com/24x/24x_CoilMount.htm
These LSx coils are wired for a ground, so unlike the L31 coil, you don’t need to have the coil body grounded to the block or anything like that, so that opens up a lot of mounting options. Hell, if you wanted to (I don’t know why you would) you could probably mount them in the cab.
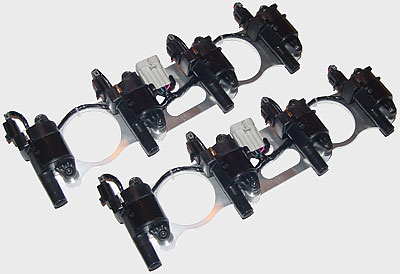
So now that you have the 24x reluctor/sensor/wiring, in, and coils on and mounted, now there is the wiring for the coils/PCM. Each coil has a 4 wire connector on it, this supplies a 12v power source, a ground, a reference, and a command signal wire. Each bank is wired back to a single 7 wire male/female connector. Each coil on a specific bank shares the power, ground, and reference wire, so they’re all spliced together stemming from the 7 wire connector, and each has its own command signal wire (4 signal wires +1 12v, +1 ground +1 reference = 7wires per bank).
Each signal wire and the 2 reference wires (one for each bank) runs directly back to the PCM, and we’ll talk about wiring those in a minute, first let’s discuss where to get the power/ground signals. Remember when you removed the original coil and ignition module? That left the 2 connectors from the harness unused. What I did, was to lop off the connectors for both the original coil and ignition module. The pink wires are both 12v sources from fuse ECM1 at the fuse box, they are on the same circuit and used to power the original coil, I used both the pink wires as the 12v source (1 wire per bank) to power the new coils, then there is a black/white wire from the ignition module connector, this is a direct ground, I spliced that wire into 2 and ran one to each 7 wire connector to supply the ground. This provides both the ground and 12v source for each bank of new coils.
After removing the old coil/module connectors and using the power and ground, you are left with some extra wires, there are 2 white wires, and what looks like 2 white/black wires. The white black wires are actually each end of the same wire, if you unravel the harness back a little bit, you can just remove that wire completely. Then there are the 2 white wires. These are actually both for the same thing, they control the tachometer output to the instrument cluster from the PCM. All you need to do is splice these wires together, one side goes to the instrument cluster, the other to the PCM. The side on the PCM needs to go to pin C2-10 on the 411 PCM which provides a engine speed signal (if you’ve done the 411 swap before starting this project you’ll move pin C2-26 to c2-10 for the tach signal, if you haven’t done the 411 swap, then you’ll need to look up your year schematics to find where this is coming from), this also needs some adjustment in the tune to read correctly on the cluster. We’ll discuss tuning in a little bit.
Now the coil wiring is pretty simple and complex at the same time, first off the simple, each coil has a wire running to it directly from the PCM, second, the low reference for each bank runs directly from the PCM. Pretty simple. Here are the schematics for a ’01 LS1 which is how you want everything wired:
LS1 Coil wiring schematic Bank 1
LS1 Coil wiring schematic Bank 2
Pretty easy. Now for the complex part. The Gen III motors have a different firing order than the gen I’s. This CANNOT be changed in the tune, it needs to be hardwired for both the injectors AND coils. Basically you need to swap the wiring for cylinders 2 & 3, and 4 & 7. The coil wiring is easy enough. Just make sure that you swap the wiring for those cylinders in comparison with those schematics above. Basically for the coil wiring you want to do this:
A Purple wire to------C2-26 for Coil #1 Control
a Red wire to---------C2-29 for coil #7 Control
a Lt.Blu/Wht wire to--C2-28 for coil #6 Control
a Dk.Grn/Wht wire to--C2-27 for coil #4 Control
a Purple/Wht wire to--C2-66 for coil #8 control
a Red/Wht wire to-----C2-69 for coil #2 control
a Dk.Grn wire to------C2-68 for coil #5 control
a Lt.Blu wire to------C2-67 for coil #3 control
a Brown wire to C2-60 for Bank #1 Coils-Low Reference
a Brn/Wht wire to C2-61 for Bank #2 Coils-Low Reference
The injectors for me were easy, I already have a true MPFI setup with external injectors, so I just swapped the connector on them. However if you have an L31, you’ll just need to swap the pins for the injector controls at the PCM, if you have a 411 already installed, you need to Switch the wires of (C1-3 and C1-4) and (C1-43 and C1-44), if you don’t have the 411 installed, shame on you, and you’ll need to find your specific schematics for the proper pinouts.
Alright, the install is pretty much finished at this point, you’ll need to put on some new plug wires, you have some options here, you can go with LS1 plug wires, which are ~8” long and I found them to be too short for my application, you can also use the gen III truck wires (i.e. LQ4/LQ9 wires) which are the same as the LS1’s but they’re about 12” long. But you’ll have difficulty finding these wires with actual 90* boots on the plug end (which I needed to fit under my headers). I ended up using a plug wire kit and making my own leads. If you want to do this you’ll need some MSD PN 3304 for the coil end connectors of the wire, and any universal make your own plug wire set with the plug boot of your choice on the other end.
One last non-tuning issue you might deal with is the A/C. Some of you may not have this problem, but mine is an early ’96 truck and the PCM setup did not work with my A/C. it ended up being easy to fix though. What I had to do was this: I eliminated both the high pressure and low pressure switches (just unplugged them, and spliced both wires together from the connector on each sensor), then you need to install an LS1 3 wire A/C pressure sensor on the Schrader port coming off the high pressure line (NOT the 143a access port, it’s an actual pressure port Schrader valve).
The LS1 A/C connector is wired as follows for a 12200411 PCM:
pin A (or 1) going to PCM pin C2-57,
pin B (or 2) going to PCM pin C1-45,
pin C (or 3) going to PCM pin C2-14.
And lastly, you’ll need to splice in an extra wire off the dk green wire going to the A/C compressor clutch and run it back the PCM pin C2-18. This will provide an actual A/C pressure input to the PCM, and allow the PCM to control the A/C correctly, as well as cycle PCM controlled e-fans to be controlled based off A/C pressure rather than having them simply always on with the A/C. I find that the PCM wired E-fan is the way to go, the 411 does an excellent job with them and is extremely reliable.
Now that everything is installed, we need to work on the tune. I had some initial problems with the tune, you HAVE to use an LSx based tune for it all to work, you can’t use an Xvan based tune (like the stock L31 411 PCM swap requires) and copy the LS1 tables in, it just won’t start. So what you need to do is start with a good LS1 tune (Fbody for cable driven throttle bodies, corvette for DBW setups), I used a 2002 Fbody tune, copied the tables like VE and spark maps and other pertinent tables (a lot of them, I’m not going to list them all, but it was a lot of the engine calibration section) into the Fbody tune, but left the Fbody coil tables (i.e. dwell time, etc)as is to work correctly with the new setup, I also searched out all the tables that were referenced to the 24x crank signal, and kept them the same as the Fbody tune. It’s an involved process, and if someone needs help with it I can help out, but I’m not going to list the dozens of tables that do and don’t need altering.
Here is the EFiconnection sites with some stock tunes as well as tunes people are using:
http://www.eficonnection.com/24x/24x_Calibrations.htm
http://www.eficonnection.com/eficonnection/24x.aspx
One thing to note when choosing a base tune to work with, the 24x setup has the ability to run a drive by wire electronic throttle, as opposed to the cable driven throttle that we use on our trucks. If you run the drive by wire, you need to use a base tune that is drive by wire (i.e. ’02 vette, ’02 esky), but if you’re going to use the cable throttle, you need to use a cable throttle base tune (‘02 Fbody, ’02 silverado)
I have not done the electronic throttle swap yet, so I’m not going to go into that, if you want to run a drive by wire TB, contact eficonnection for help.
One last note I'll make about tuning is to get the tach signal reading correctly. It is just a change in tables G1204 & G1205 for the high and low tach pulses. Stock LSx tune has them at 6, the Xvan tune has them at 1, and I found that at about 3 the tach signal was pretty accurate throughout the RPM range for the 24x swap.
Once you get the proper tune in the PCM, you can start ‘er up. Mine has been running flawlessly for about over a year. I no longer have the problems that I did with the cap/rotor, the idle is smoother, I’ve got boatloads more control over the coil and spark through tuning, and the setup is SO much more reliable. If you aren’t already, once you get into tuning, you can play with settings for things like spark dwell and such. Here is a nice video comparing the LS1, LS2, and gen III truck coils. It has a lot of good information about things like dwell time and can help with tuning things like that. As well as info to help you decide what kind of gen3 coils you want to run with the 24x setup.
http://video.google.com/videoplay?do...5754251&hl=en#
And speaking of coil choices, there are some aftermarket LSx type coils out there, like MSD, don’t get them, they are outrageously expensive, and from my research on them, are actually WORSE than the stock LS2 or gen3 truck coils.
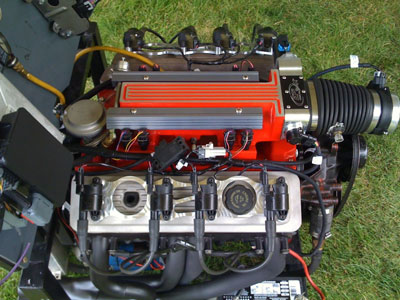
And for reference, here is a picture from eficonnection’s site which shows an LT1 with the 24x setup installed, in this picture, you can see the capped off distributor, as well as the coils mounted on the valve cover with EFIConnection’s coil mounts.
That’s about it, Here is the thread from when I installed this on my truck, I did A LOT of things at the same time including installing the Whipple, new heads, etc, etc, so the whole thread isn’t about just the 24x and coils, but there is a lot of info in there about it.
http://www.pacificp.com/forum/viewtopic.php?t=8757
Here is a thread about the conversion done in a ramjet engine:
http://www.pacificp.com/forum/viewtopic.php?t=7933
To comment, discuss, or ask questions about this article, please click here to visit our forum.