

by: Aloicious
Thanks to: S10wildside
Oct 28, 2011
Please read the disclaimer page
Please visit our FORUM. All discussion, questions and comments about this article are welcome.
The preface to part 1 of this article is that you are trying to install a vortec distributor that has been removed without marking its position first. If you have not removed the distributor yet, it is a wise idea to mark the distributor body and rotor position prior to removal so that it can be reinstalled in that postion without having to rotate the engine. Part 2 is universal and will help you properly set the postion sensor.
Before we begin the instructions, we should understand what the cam sensor does and why its important to properly align it. The camshaft postion signal is used by the PCM to determine the postion of the camshaft and verify the intake vs exhaust stroke for specific cylinders. On a distributored vortec engine the cam sensor also helps the PCM control the advance and retard of the spark. While cranking, the PCM monitors engine RPM from the crank signal, if after a few seconds of cranking without an increase in RPM seen at the PCM, the computer will assume an improper cam position (engine stroke) and assume the opposite stroke in an attempt to start the engine. On vortec distributored engines you CAN NOT set the distributor with a timing light, the PCM is constantly adjusting and correcting the spark advance, and a timing light will not provide an accurate way to adjust the timing, don't even waste your time trying it. An improperly set camshaft sensor may set a P1345 DTC code, extended cranking before starting, engine backfire while cranking, and poor spark control from the PCM which can cause further issues.
Part 1 Installation and Rough Cam sensor alignment
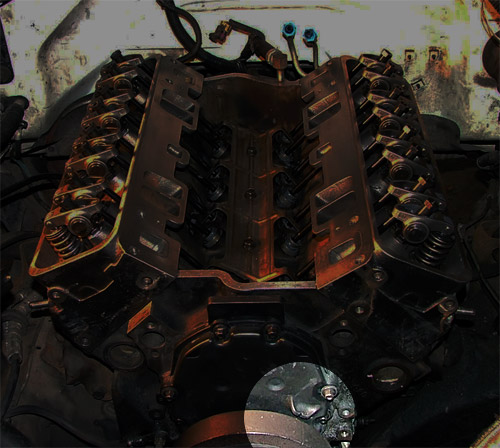
Before you install the distributor you need to rotate your engine to top dead center on cylinder 1 compression stroke. To do this you want to align the timing mark on the crankshaft harmonic balancer with the mark on the timing cover. These marks are located in the highlighted area of this pic, its not the greatest picture but the only one which shows where these marks are properly. This image was taken while new heads were being installed so the engine is stripped quite a bit.
These marks are aligned at either TDC compression stroke for cylinder #1 OR cylinder #6. To verify that it is aligned for cylinder #1 you can remove your bank 1 valve cover and make sure both the intake and exhaust valves are closed, if they are not, the marks are aligned for cylinder #6, rotate the engine another 360 degrees and re-align the marks, the valves should be closed now and cylinder #1 is at TDC on the compression stroke. There are other ways to check if the marks are aligned for #1 or #6, but watching the valves is the most accurate.
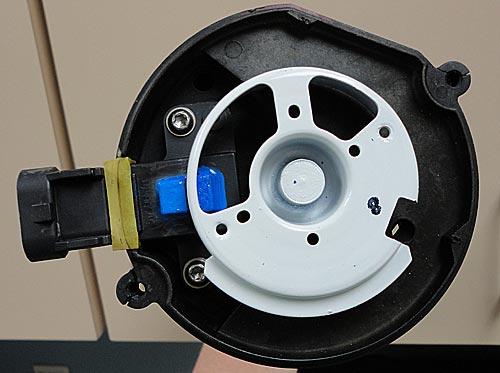
Now with the engine properly setup, take your distributor body without cap or button installed. You will see a #8 stamped on the rotor right next to a cutout on the rotor itself. You'll also see the camshaft position sensor mounted on the distributor body itself. And cast into the distributor body rim there is a small point. Also there are windows cut out of the rotor, a larger one, and smaller one, we'll focus on the larger one. Now that you have found these 4 landmarks (rotor cutout with "8" stamp, postion sensor, large rotor window, and distributor rim point), and before attempting to install the distributor you'll want to align the point on the distributor rim to point at the "8" stamped on the rotor (where the rotor cutout is), doing this will align the cam postion sensor directly on the edge of the large window. See the image below to help clarify all this. you'll see the point and "8" are aligned as well as the postion sensor. In this picture I have painted the rotor white, and the postion sensor blue, and the stamped "8" has been written in black marker, this is just for contrast in the image, they will not be colored like this on your distributor. Roll your mouse over the image for extra clarification on the alignment points.
This alignment is NOT the proper alignment, however as you install the distributor the rotor will turn slightly, this alignment will help provide the proper rough alignment.
Now allowing the rotor wheel to rotate freely, install the distributor body into the engine, the sensor plug receptor on the distributor body should be facing roughly to the rear left of the engine. the rotor wheel should turn clockwise when the distributor gear engagees the camshaft gear. Once the distributor body is fully seated it should be close to the proper final alignment, however a slight rough adjustment may be necessary. You'll want to rotate the distributor body so that the camshaft postion sensor aligns itself with the edge of the small lip protruding from the rotor wheel body as shown below, again roll your mouse over the image for further clarification.
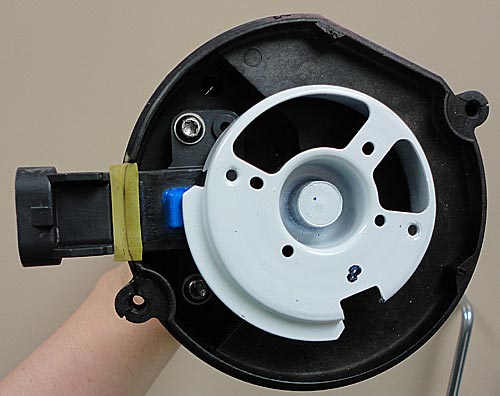
This is the rough camshaft alignment. You can lightly tighten down the distributor hold down clamp (not too tight if you're going to be fine tuning the alignment at this point), and install the button, cap, and wires. With this alignment set properly, the truck should run, and shouldn't set the P1345 DTC code.
Part 2 Fine tuning and final setting of camshaft sensor
In order to fine tune the camshaft sensor and lock it down in the fully correct postion you will need access to a scanner which is able to view live data and read the CMP Retard Offset data from the PCM. There are a few scanners that can do this, however I do not have an all inclusive list of them, the most common ones that are used for this are the TechII from GM, and EFILive. If you do not have a scanner that is capable of this, you have a few options. You can get one, like the EFILive scan tool, or scan and tune, or after completing the rough postition alignment from step 1, you can take the truck to a shop which has access to the proper scanning equipment to have them set it, this should only take a short time to perform, however most shops have a minimum labor charge which can be quite expensive. Because there are different scanners which are able to read the CMP offset, the instructions below will be generalized and not specific to any one scanner. If you require further help, please feel free to ask in our forum.
Okay, before you start up the truck, go ahead and loosen the distributor hold down JUST A LITTLE BIT, you want it to keep the distributor lightly in place, but not too tight so you can turn the distributor body by hand. With the rough alignment in part 1 complete, your truck should be able to run. Go ahead and start the truck and let it idle, connect the scanner to your OBDII port, a long cord will be very helpful as you'll want to view the data live as you're trying to set the cam postion. Start up the scanner and connect it to the PCM so it shows the live PCM data, make sure it is properly showing the CMP retard offset data. Run the scanner or laptop out to the engine compartment and find a safe and viewable place to prop it up while you get ready to adjust the distributor body. Have a friend get in the cab and rev and hold the engine at 1000-1200RPM, if using EFILive, the Bidirectional controls can be set to hold the RPM to that value, you want to keep the RPMs above 1000, but not higher than 1200. Watch the scanner data while the engine is held at that RPM, you'll see the CMP offset is a number readout in degrees. You want it to be as close to zero as possible, but it is VERY sensitive, so being directly on zero may not be possible, anywhere from -2 degrees to +2 degrees is within specification. Go ahead and adjust the distributor body clockwise or couterclockwise while watching the CMP offset live data, once you get it set to spec, go ahead and tighten down the distributor hold down, keep watching the CMP offset while you tighten it to ensure that the correct setting retained until the distributor is solidly held down.
Congrats! you now have a properly installed and set vortec distributor.
To comment, discuss, or ask questions about this article, please click here to visit our forum.