

by:Aloicious
Thanks to '90Rado, RSTahoe99, 88GMCTruck, Lextech, and Project88!
Jan. 22, 2011
Please read the disclaimer page
Visit our FORUM. All discussion, questions and comments about this article are welcome, Click here.
Swapping a 4L60e Automatic for a T56 6 speed manual in a GMT400. Specifically mine is a 1996 C1500 5.7L L31. But it is very similar (if not identical) for most all GMT400 trucks. Most images used are my own, however some are taken from friends who have done the swap as well, all pictures are used with permission.
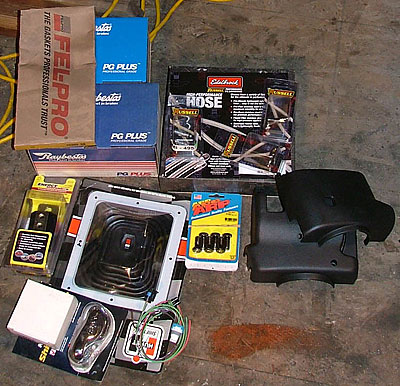
Some parts you’ll need:
-T56 transmission, clutch fork/Tbolt
-bellhousing,
-Fbody slave cylinder,
-inspection cover (if you can find one, if not it’s not a requirement),
-flywheel/pressure plate/clutch disc setup with throw out bearing, clutch alignment tool,
- pilot bushing/bearing
-LT1/LT4 starter, starter shim kit
-Truck Master cylinder,
-fittings to connect the master and slave, clutch hose
-Clutch pedal assembly from a manual
-shifter stick/boot/knob/cosmetic stuff
-bolts – bellhousing to transmission, flywheel to motor, pressure plate to flywheel, slave cylinder studs/nuts, master cylinder nuts, clutch bracket nut/bolt, possibly others depending on your specific setup
-reverse lights pigtail, VSS wiring setup(possibly), reverse lockout pigtail (possibly),
-~4 quarts of Dexron III ATF or your fluid of choice
-brake fluid (for clutch hydraulics)
Lets first talk about the T56, for a gen1 or gen1e SBC, you’ll want to get one from a 1993-1997 F body car for the easiest swap. I’d suggest one from a 1994-1997 LT1 Fbody as they are rated for better power handling than the introductory 1993 year was. Though with additional modifications (which we won’t discuss here) you CAN use a T56 from most anything including vipers, SRT10 trucks, cobras, Holden Commodore/Monaro, even Aston Martin DB7 and V12’s came with them. I would not recommend even looking at the corvette T56’s, though internally they are similar, they are mounted and used very different than the rest (the vette ones were made to mount at the rear by the differential rather than up on the motor, mainly to give a better weight distribution to the car. it would be very hard to use one of these without modification)…the good thing about using a 94-97 LT1 Fbody T56 is that they are typically the most common ones. Here is the rundown of different T56 models, their gear ratios (1,2,3,4,5,6,R), and power handling ratings (most of the ratings are on the conservative side of things, I know many stock T56’s that run much more than these ratings and have held up for a long time)
1993 LT1 Fbody T56 – 2.97, 2.07, 1.43, 1.00, .80, .62, 3.28 – 350 ft-lbs
1994-1997 LT1 Fbody T56 – 2.66, 1.78, 1.3, 1.00, .74, .50, 2.90 – 450 ft-lbs
Viper – 2.66, 1.78, 1.30, 1.00, .75, .50, 2.90 – 550ft-lbs
’03-’04 Cobra – 2.66, 1.78, 1.30, 1.00, .80, .63, 2.90 - ??400-450 ft-lbs – no specifics on power handling found
Okay, now once you have your T56 (I’m assuming you’ll be using a F body trans since it’s the easiest to swap in, and that’s what I used, so that’s what my experience is with). There are a few things you need to contemplate before jumping into the swap. The T56 is a strong trans in stock form. However remember that our trucks outweigh the Fbody cars the originally came in by a decent amount. It would be a good idea to rebuild the trans and get it in ideal running shape if it’s a used unit, since we really can’t trust how the previous owners took care of it, and if you do open up the trans, there are some excellent upgrades that can be accomplished fairly cheaply and easily which will vastly increase the power handling and longevity of the trans. Rebuilding and modifying a T56 isn’t really too hard, but for this write up I won’t go into explicit detail on how to perform a trans rebuild, but I will mention important things. Lets suffice it to say that a general rebuild would be a good idea, I would suggest replacing the bearings, blocker rings, seals, possibly the synchros, and inspecting the gears for wear/damage/abuse (and replacing any hard parts as needed). If you’re in the trans for any reason you’ll want to do some upgrades, mainly look at replacing the stock aluminum 3-4 shift fork with a steel 3-4 fork, upgrading to billet synchro keys for the 1-2 and 3-4 synchros, upgrading to carbon fiber blocker rings, and upgrade to bronze shift pads. I’d also highly recommend a good aftermarket short throw shifter.
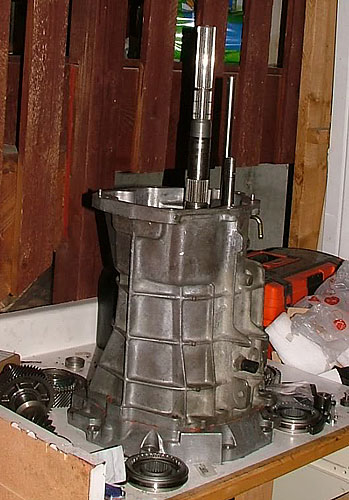
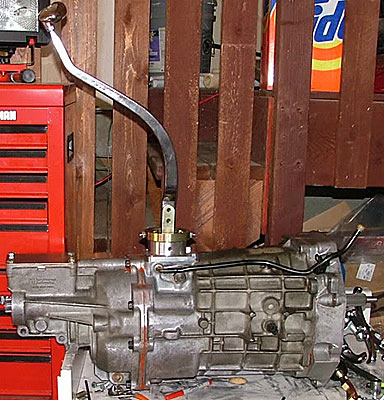
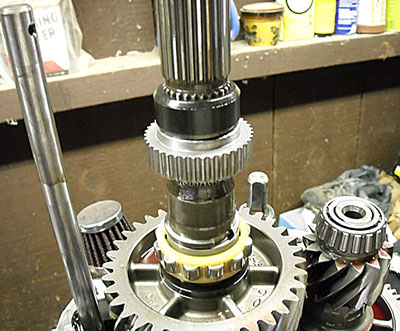
Okay now mentioning the shifter brings me to another issue, mainly shifter placement. The stock T56 has the shifter at the very end of the trans. It works great in the cars, but can be an issue with our trucks. This is a picture of a stock T56, note the shifter placement:

This placement can cause interferences with bench seats and center consoles. Here is a pic of where a stock 5 speed shifter would protrude compared to a T56 shifter, (this picture is from an S10, not an identical match to our trucks, but the shifter differences are virtually identical)
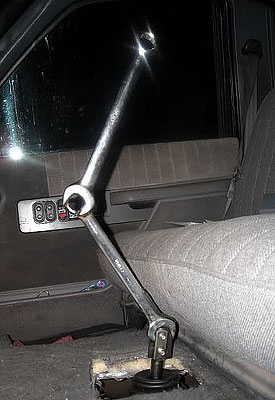
Here is a picture of where the T56 shifter will protrude in a ’90 GMT400 with a bench seat, checkout his sweet shifter handle he made to clear the bench.
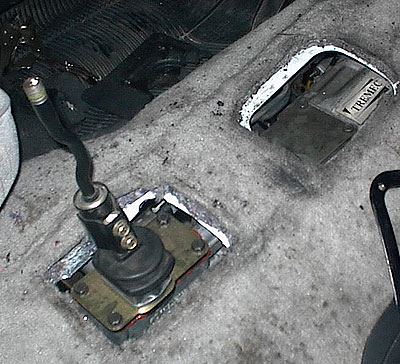
So what if you want to keep your bench or center console? There is an option, but it requires a bit more work than most are willing to do. You can alter the internal main shift rail of the transmission to move the shifter up to the inspection plate is on the trans about 4-5ish” forward from the stock T56 shifter location. This puts the shifter placement almost exactly where a 5 speed shifter would be located, this is what I did. Here is a picture of where my shifter protrudes in my 1996 GMT400 truck with the shifter relocated:
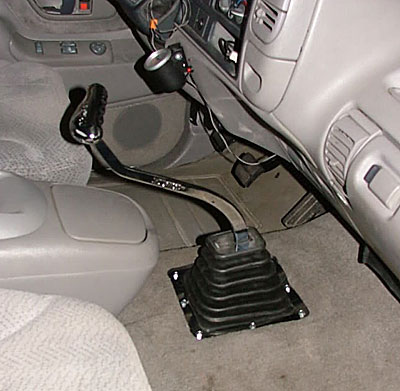
The shifter stick in that picture is just a Hurst stick, and it works perfectly, it does not touch the console or the dash. I did however have to heat it up and bend it slightly to bring the knob closer to the driver’s side for comfort. However, any stick could be used, it’s just personal preference.
Here is a pic of my modified T56 with the shifter in the inspection plate position:
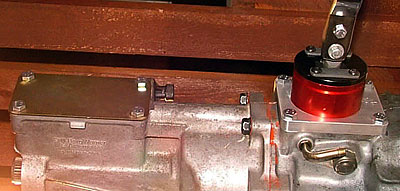
The kit I used for the modification is made and available from Keisler, here: http://www.keislerauto.com/vmchk/gm/gm-bare-transmissions/6-speed-manual/t56-front-shift-conversion-kit/shop.flypage_acc.html . I should make note that the shifter which comes with the Keisler kit to fit the forward inspection plate was of poor quality, the lower seal on it came brand new ripped in half, and the shifter itself started shedding a few small internal parts during my test fitting. I was not pleased with it. What I ended up doing was modifying a ’03-’04 Cobra T56 Pro 5.0 shifter to fit the front cover. Here is the different shifters installed on the trans:
Pro 5.0
Keisler

It fit almost perfectly, except it was just barely too short as seen in these pics:
(’03 Cobra pro 5.0 on the left, Keisler shifter on the right)
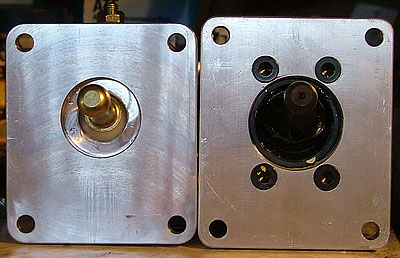
Here are the unaligned bolt holes on the T56:
I ended up elongating the 2 bolt holes out on one end, and making a small cap that extends over that end of the shifter base, unfortunately I don’t have pics of the finished product but it has been working fine, seals up well with silicone, and has presented no issues. The cobra shifter even aligns perfectly with the rail adapter on the Keisler kit:

Okay, now you’ve got a T56, you’ve got it rebuilt and modified however you feel you need to in your specific setup. Now what about the actual swap?
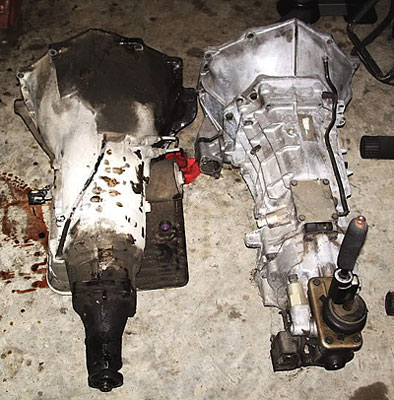
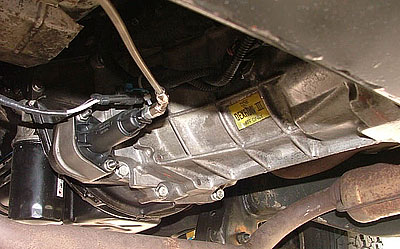
GM helped us out a lot on this swap. It turns out that GM didn’t want to make things difficult when building the 4l60e vs. the T56 Fbody cars, so the Fbody T56 is the exact same length as the 2wd 4L60e’s (even the same as the truck ones), they use the same trans mount, and for the full size GM400 trucks, we can use the same trans crossmember, and same yoke. Thanks GM! Here’s a pic of a T56 next to a 2wd 4L60e:
But before we get the trans in, we need to get the clutch pedal/master cylinder setup in there. There is a lot of confusion around the clutch pedal bracket. From what I can gather there are 2 main clutch pedal brackets, one from 88-94(95), and one from 96+. However there is some grey area with them. 1995 apparently was SUPPOSED to be the changing year to the new design. however I have owned both a 1992 pedal bracket as well as a 1995 one. They were identical. There is also someone I have talked with who did the swap on a 1999 GMT400 truck, and the early pedal bracket style from a 1995 would not fit on his 1999, and he was required to get a newer pedal bracket from a 1998 for it to fit. Yet in my 1996, I currently use a pedal bracket from 1992 which works perfectly. So the best I can figure is that the 1995 and 1996 years were transitional years. Some likely used the old bracket, some the new. Unfortunately, for those years it may be hard to know what will work and what won’t. Let me just say that the earlier bracket style is easier to find and I did not have any problems installing one in my 1996. There are also some other unknown brackets out there, here are some diagrams of the pre1996 bracket setup, and the post1996 setup:
Pre1996:
1996+:

Then there is this diagram which seems like a different bracket, but I do not know what years it came on:
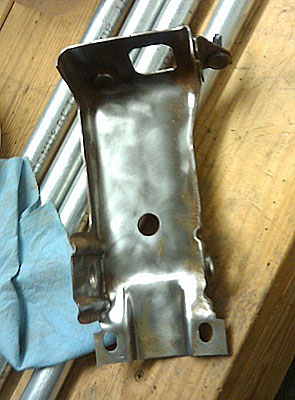
What you’ll want to get is a clutch pedal/bracket setup from a year similar to your GMT400 truck if you can. In my 1996, I used a pedal bracket setup from a 1992 truck, which is the earlier bracket style, like this one, which is out of a 1995 (and identical to the one I used from a 1992 truck):

This is a newer style pedal bracket from a 1998:
And here is yet another unknown bracket. This was installed in a 1990 truck, however we do not know what year truck this came from. I’m suspecting an earlier truck, perhaps a 87-88 transitional year or something? But I cannot be sure of that:

GM didn’t feel the need to paint or rustproof the bracketry for some reason, so you may have to clean up some serious rust. The pics above from the ’95 were some of the least rusted ones I’ve seen. For mine, I stripped the rust off everything, cleaned it up, primed it, and painted it all flat black. So it’s rust proof now, and looks fairly good if anyone happens to painstakingly crawl under my dash and look at it.
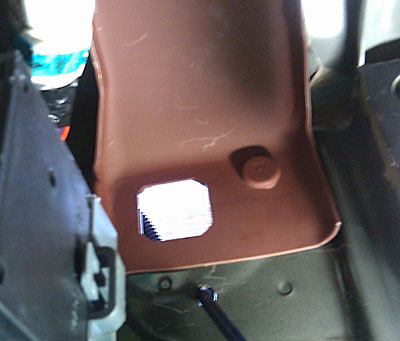
To mount the clutch pedal bracket it’s pretty easy, GM had most of the landmarks marked and prepped for it already, you will need to drill 3 holes in the firewall, 2 small ones for the master cylinder studs, and one bigger one for the master cylinder to mate with the pedal pushrod. I don’t have exact sizes on these holes, once you get your master cylinder, just measure for them and you’ll be fine.
The master cylinder studs will go through the firewall to mount the master cylinder to inside the engine compartment, and the other end of the pedal bracket has 2 holes in it as you can see from the pics above, these will line up with some landmarks in the cab. For me there was already 1 stud coming down to go through one of the holes, and the other one lined up with a pre-threaded hole in the cab located way up underneath the dash. I simply put a wing nut on the stud, and a bolt in the hole and it was all mounted. Here are some pics of the pedal assembly mounted. It’s really crowded up there, so these are the best I could get, if you crawl under there and look you should see what I’m talking about, the flat black part here is my pedal bracket which I painted, this is the back of the bracket where the stud and prethreaded hole are:
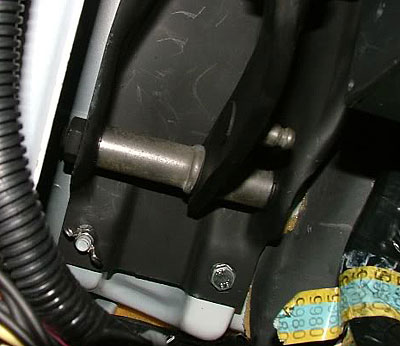
I have been told that the pre-threaded hole and stud should already be installed on all 95+ GMT400 trucks, but the pre-95 ones may need to be added. The additional bracket with these can apparently be purchased at the dealer, and welded in.
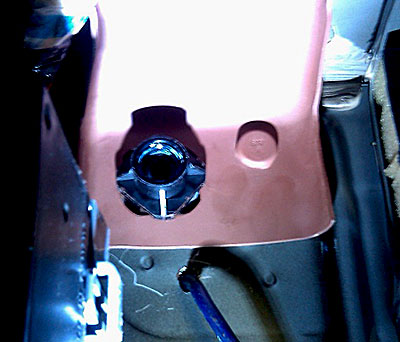
Here is the 1998 bracket installed in a 1999 gmt400 tahoe, this is the front of the bracket against the firewall:
Same bracket with the master cylinder put in (no pedal rod attached yet):
The P/Ns I was given on the clutch pedal brackets are as follows, however these may be discontinued, and/or changed by now:
88-94: 15679661
95: 15714315
96-00: 15030123
Now that is on, what you’ll need is a master cylinder, I used a stock master cylinder from a GMT400 truck I purchased from the parts store. It mounts to the pedal bracket studs on the other side of the firewall in the engine compartment. You’ll want to get one that is made for the same year pedal bracket you are using. Here’s a pic of a one I had on mine which is for a 1992 truck:
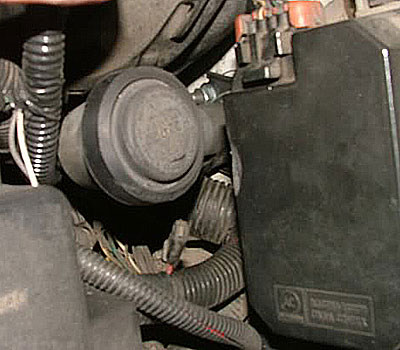
It comes out just below the cruise control module, which is what that black box is above it. Make sure you have the clutch pedal pushrod and everything connected and engaging the master cylinder correctly. It’s easy to put on and the instructions that came with the master cylinder were good.
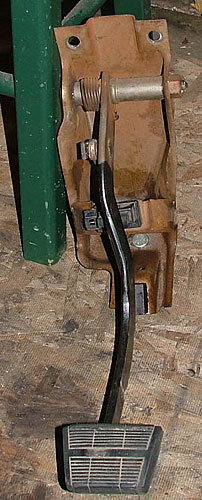
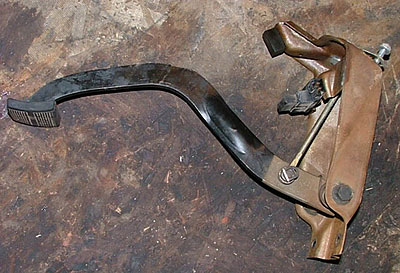
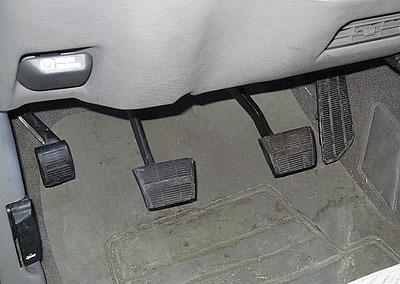
One last thing about pedals, the brake pedal in an automatic is larger than the brake pedal in a manual. You have 2 options here; you could get the brake pedal from a manual truck and replace the automatic pedal with it. I tried this, but the pedal I got from the ’92 truck did NOT fit in the ’96, the curvature of the pedal restricted it and would not allow the pedal to travel all the way back up. Your other option is easier, get a manual truck brake pedal pad (it’s the same part # as the clutch pedal pad), pull your brake pedal off, and cut the automatic pedal down so that it fits the smaller manual brake pedal pad. It’ll slip right on, and no-one will be the wiser. Here’s a pic that shows the clutch and cut down brake pedal:
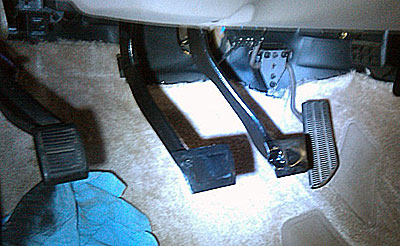
Here is a pic that shows the cut down brake pedal with the manual trans brake pedal pad installed:
Now about clutch hydraulics, what you’ll need to do is mate the truck master cylinder with a T56 slave cylinder. This is fairly easy and can be accomplished a few ways. What I did is get a set of clutch line adapters made by Russell, P/N 640281 which makes it easy to mate the clutch line inputs/outputs to a standard 3 –AN line with a standard hose end on it. I used regular 3 –AN hose end fittings and some stainless braided brakeline hose to connect the two clutch adapters. Been working great ever since. I have heard that you can take the stock truck hydraulic line, and just plug it into the Fbody slave, but I haven't tried that, so I can't verify that it works.
You also have some options on the slave cylinder. The stock T56 slave will work just fine, however it is lacking in some respects IMO. First off, it’s made of plastic, I didn’t like that, secondly it has no bleeder screw, so bleeding the T56 slave can be tricky, though it’s not impossible. Your other option is a slave cylinder from a 1992 Camaro 305 5speed car. These use the exact same dimensions and mounting as the T56 slave, but it’s made of all aluminum (yay!), and it has a bleeder screw built in, which is a nice convenience. This is what I am using and it does great. I started out with the plastic T56 slave cylinder, and it does work fine, it is usually available at a parts store and comes with good instructions on how to bleed it.
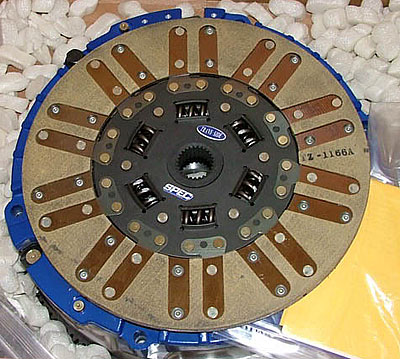
Okay, now the pedals are all taken care of, the hydraulics are good, the T56 is ready. Now we can look at actually installing the T56. After we pull the 4L60e, and remove all the transmission lines/cooler/flexplate/etc. we will want to install the clutch/flywheel setup onto the motor. I use a SPEC brand clutch setup with a billet steel flywheel from them as well. It can be hard to find a stock T56 LT1 flywheel, which is why I opted for the billet steel one, it may cost a little more but has been working very well. There are several clutch setups out there to choose from. You want a clutch setup made for the 94-97 LT1 Fbody cars. You can even use the stock setup. I won’t go over choosing a clutch setup, as there is a lot of info out there if you google ‘LT1 T56 clutches’. Be aware that the LT1 T56 used a strange pull style clutch setup, so the choices are limited, and can be expensive. But I’ve been using a Spec stage 3 for a while with great results. Some other companies that make LT1 T56 clutches are McCleod, Zoom, Centerforce, and others. You can also buy a stock pressure plate and mate it with the clutch disc of your choice. Look around for what you want and can afford. This is the clutch from my initial Spec stage 2 which I had installed but got oil contaminated and I had to replace, which is when I put in the Stage 3 disc:
First thing is first, if you need to replace your oil pan gasket, or your rear main seal, now is a good time to do so. You’ll want to clean stuff up, and then install the pilot bushing/bearing into the crankshaft at the rear of the motor. I prefer pilot bushings over bearings, I’ve had problems with the needle bearings before in other vehicles and I’ve found the bushings are strong, and virtually bulletproof. But either one will work fine as long as it is installed correctly. What I did to install mine, was clean up the hole which is already in the rear of the crankshaft lightly with some emery cloth and some brake cleaner. I put my bushing in the freezer for approx 4-12 hours before installing it, this will make the busing shrink slightly and help the install go easier. I lightly coated the crank hole with a good quality moly based grease (I believe it was actually disc brake grease, though you could really use a lot of different types of grease), I like moly based stuff because it’s an excellent way to minimize friction, if you want some great reading on the subject of molybdenum disulfide, check this out: http://www.pacificp.com/forum/viewtopic.php?t=8641 Now take the frozen bushing and tap it in the greased crankshaft, you’ll be able to tell which side goes in first because the inner hole of the bushing, one side is radiused, and the other isn’t, you want the inner hole radiused edge to face away from the motor, this is what the input shaft of the transmission will ride on. So tap that sucker in there until its flush with the crankshaft. It may take a little bit, but try not to pound it too hard, keep it straight and in shape, it’s not an anvil.
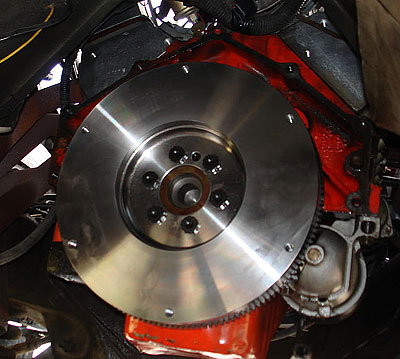
Now that the bushing is in, install the flywheel. Our SBC motors are internally balanced, however the flywheel/flexplates still have a counter weight on them, and the motors are internally balanced WITH those weights taken into account. So you want to keep it there, luckily they’re balanced the same as the LT1 motors and the flywheel is a direct bolt on. First remove your stock SBC starter, and bolt that flywheel up there, and torque it on in a star shaped pattern using good quality bolts and red locktite. I torqued it in steps doing about 3 passes up to the final torque of 74 ft-lbs.
Next you’ll be installing the clutch disc and pressure plate, so get it ready. But first we want to thoroughly clean the flywheel so that there isn’t any grease/oil/etc from anything on the friction contact area (we don’t even want oil from your skin up there, so be aware not to touch the surface after you have it cleaned), so hose that sucker down with some brake cleaner and wipe it clean with a clean lint free rag, also do the same to the fiction contact surface on the pressure plate. Now put a good amount of that moly grease in the pilot bearing (don’t get it on the flywheel contact surface!), this will be the lubrication for the input shaft while it is riding in the bushing.
Now using the alignment tool that came with your clutch setup (hopefully you got one, if not you’ll need one), place the clutch disc and pressure plate (with the throw out bearing installed) up on the flywheel and start the pressure plate bolts to be hand tight. Once it’s up there securely with all the bolts, loosen them each just slightly until you’re able to move the clutch disc around with the alignment tool inserted. Get the tool nicely aligned in the bore of the throw out bearing, and hold that alignment tool in place while you tighten up all the bolts a little bit, this should sandwich the disc between the pressure plate and flywheel. When all the bolts are tightened enough to hold the disc in place, gently slide the alignment tool in and out, you want it to glide somewhat effortlessly, if it is difficult to move, loosen the bolts and try to re-align the disc. Once it’s aligned properly tighten the pressure plate bolts down some more. This will assure it to stay in place. Then one by one, remove the pressure plate bolts, apply red locktite, and re-install, tightening them down to keep holding the disc. After they’re all installed again with locktite, I do a double check on the alignment, and then torque them down. Again in a star pattern doing 3ish passes of increasing torque. The torque specs for the pressure plate may vary from manufacturer to manufacturer. On my SPEC it was somewhere around 35ft-lbs. but I don’t have the specs here to verify that. Please check with your setup for the correct torque specs.

Before going too far it would be a good idea to cut the hole in the floor to accommodate the shifter. You’ll need to measure how far back to cut for your setup, but all you do is take an angle grinder with a cut off wheel on it, and make a nice little square cut out big enough to accommodate the shifter, don’t forget to cut out a square in the carpet too.
Okay, now that is on, we can replace the starter. We need to use an LT1/LT4 starter in order to align correctly. I use an LT4 starter and I had to shim it a little to get the correct contact with the flywheel. I won’t go into shimming procedure here, but bolt that starter up and if needed, shim it. You can find lots of info on shimming starters with a google search.
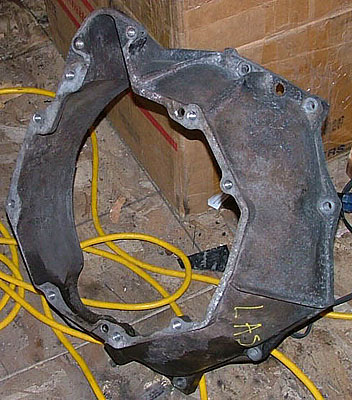
Now we install the bellhousing. You need a bellhousing from the 93-97 LT1 T56’s, and if your trans didn’t come with one they may be hard to find. I suggest contacting a company that rebuilds T56’s and ask if they have one. Many of them convert the LT1 T56’s into LSx style T56’s and have the extra LT1 style parts lying around, and may sell it at a decent price. That’s how I got mine from sixspeedinc. Back when they were in business. Here’s a LT1 bellhousing:
Bolt that up to the motor using the bolts that held the 4L60e in. there are a few little pieces that they also hold like the fuel line bracket and a heat shield for the O2 sensor wiring, etc. I don’t think I had an exact torque spec on this, I did them somewhat tight, probably somewhere in the ~30ish ft-lbs area.
Next you’ll want to install the transmission, this can be tricky to do by yourself, but it is possible. I’d suggest getting some kind of trans jack to help you. Make sure the clutch fork and T bolt is attached to the T56, I use a little moly grease on the Tbolt/fork contact to reduce friction, I also lightly grease the fork where it will ride on the throw out bearing, where the bearing will ride on the input shaft shield, where the input shaft will ride in the pilot bushing, and where the clutch disc will ride on the input shaft splines. Now align the motor and T56 and without forcing too much slide them together, you may need to pull them apart and rotate the input shaft a little if you are finding it difficult to get the splines aligned with the clutch disc. Also make sure the clutch fork is pulled AWAY from the center of the trans. Once you get them to slide together, just before the trans meets the bellhousing, align the clutch fork with the throw out bearing on the pressure plate, and push it in to engage them together, the T bolt and hold down on the clutch fork should hold it on there decently. Now push the transmission all the way up to the bellhousing, making sure the alignment pins are lined up. The trans should be (or be VERY close to being) flush with the bellhousing, if it’s not perfectly flush the bolts will help pull it together, but you do need it to be very close, those alignment dowels need to be correctly mating the trans to the bellhousing. Then bolt the transmission bolts in, they are torqued to 37 ft-lbs.
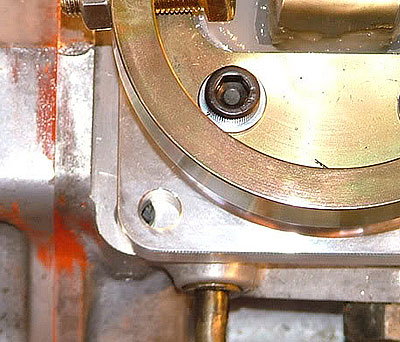
Well the trans is attached, go ahead and install the trans mount. It uses the same mount as the 4L60e. I’m not a huge fan of the polyurethane mounts, so I just used a stock one. And jack the trans up a bit so you can install the crossmember under it. The stock crossmember works just fine, however you will likely have to move it back a little. On my truck I had to move it back a couple inches, there were 2 holes in the frame that lined up with the crossmember, but I had to drill the other 2 holes in the frame out. Then I just re-used the stock crossmember mounting bolts. Lower the trans down onto the crossmember and mount the trans to it, check your vehicle manual/repair manual for the torque specs on the transmission mount, and use some locktite. Next we install the transmission yoke. Luckily since the T56 is so similar to the 60e, we can just re-use the same yoke. They have the same output shaft size/splines/etc. so it should go in without too much difficulty, if you replaced the rear bushing in the T56, it may need a little coaxing, but not too much. you’ll probably want to lube up the yoke with some Dex III ATF to help it slide on easier, but it shouldn’t be overly difficult, a gentle tapping with a deadblow may help if needed, but don’t pound on it.
Next install the driveshaft, also luckily, since the T56 and 60e are the same length, you can use the stock driveshaft. I have mine balanced and put new U joints in while it was removed, and I’d recommend it. Re-install the driveshaft and make sure all the mounts, bolts and ujoints are correctly installed (like the center bearing, etc), refer to your repair manual for the truck if you need assistance with doing that.

Back up to the front, we can install the slave cylinder on, make sure the clutch fork is still engaged with the throw out bearing, and install the aluminum slave spacer (which is part of the bellhousing), and the slave onto the studs in the bellhousing with the slave pushrod engaging the clutch fork, then tighten them down. Again I can’t find the actual torque specs on this, but you want it fairly snug on there.
Now you can fill your trans with fluid. The recommended fluid is just plain old non-synthetic DEXRON III ATF. If you haven’t upgraded your blocker rings to the carbon fiber ones, that is all I would run. If you have upgraded, some people report good results with other fluids like GM Synchromesh, royal purple Synchromax, Mobil 1 or other synthetic Dexron III ATF, even Honda ATF. You can experiment and search around for what you would like to do with that. The T56 is easy to fill, remove the fill plug (make sure the drain plug is in good), and fill with fluid, it takes ~4 quarts to get it full (4.1 according to Tremec), you want enough fluid so that on a level surface the fluid will just start to run out of the fill hole. Once it’s full, replace the fill plug.
At this point you can also install whatever kind of shifter stick/knob/boot setup you’d like, also while you’re in the cab, check the clutch pedal engagement/disengagement and make sure it is to your liking, I ended up shimming my slave cylinder out a little bit to give the pedal travel/engagement point I wanted. I used a sheet of 1/8” thick aluminum and cut it out to sandwich between the slave cylinder and slave mount on the bellhousing. My clutch engagement was too far up the pedal travel for me, the 1/8” spacer lowered the pedal engagement point to exactly where I wanted it.
Here is what I'm talking about, this is a 1/8" thick spacer that has been roughed out of a piece of metal (I used aluminum to avoid rust and what not, I'm not sure the material that was used on the one in this picture, if you're making one I'd suggest aluminum, or stainless steel), this gets sandwiched between the slave cylinder and the bellhousing:
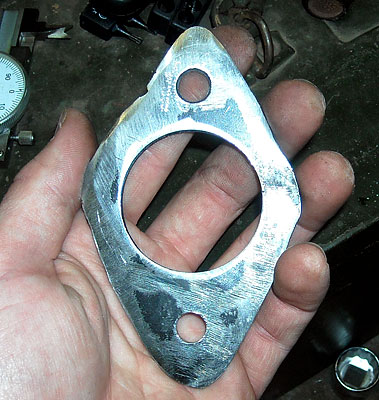
If you wanted to, you could probably just use some washers on the slave mounting studs, but it would leave a gap between the slave and bellhousing, and I didn’t want road crap to get up in there.
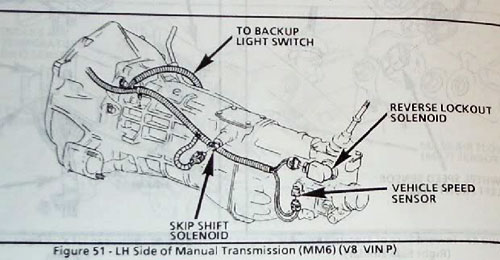
Now we can talk about wiring. When it comes to the automatic wiring, I removed ALL of it that I could. It is as if the truck would have come from the factory with the T56. however there are a few wires we can use. Here’s the location of the wiring inputs for the T56:
First off is the speed sensor. Luckily they’re identical for the 60e and the T56, so just plug in the speed sensor connector to the T56 that you removed from the 60e. Then there are the reverse lights, I sorted though the automatic wiring and found the wires that commands the reverse lights from the harness and just spliced on a pigtail connector for it. You may need to tap into the supply wires going back to the reverse lights themselves if you can’t find the ones from the 4l60e harness. Polarity on this doesn’t matter.
Here is the wiring for the 4L60e neutral safety switch (4l60 and 4l80 use the exact same wiring)
Purple- high current to starter solenoid
Yellow- high current from ignition switch (start position)
Pink- IGN3 +12 VDC (hot in run or start)
Light green- +12 to BTSI solenoid (through brake switch, normally closed) in park
Second light green (terminal F)- backup lights
Small yellow- connection to liftgate motor, ground side (only on suv's)
Black- ground
Transmission Range Switch Signal A (blk/wht) = Pin 9
Transmission Range Switch Signal C (grey) = Pin 10
Transmission Range Switch Signal B (yellow) = Pin 11
Transmission Range Switch Signal P (white) = Pin 12
On a 98 the purple wire is much smaller and the large yellow wire changes to a small purple wire with a white stripe. Sometime between 96 and 98 they replaced the high current wires with a starter solenoid that does not draw high currents.
Next is the clutch pedal position switch, this is the switch below the clutch pedal which prevents the car from starting if the clutch isn’t pushed in. there are 2 larger gauge wires coming from the 60e harness, one yellow, one purple, these go to the clutch pedal switch, so you’ll need to route them through the firewall, polarity on them doesn’t matter either. And then there’s the reverse lockout, this is optional to wire up, but I like it, basically it connects to the PCM and locks out reverse for any speed over ~3-5 mph, this is just a safety thing so you don’t try and jam it in reverse when you’re trying to shift into 5th, or so you aren’t able to go into reverse while you’re going forward very much, and when you’re below 3-5 mph, it unlocks and you can easily go into reverse. If you don’t wire this up, it won’t be active, you’ll still be able to get into reverse but without it unlocked you’ll need to just muscle it in there some. It’s not overly difficult though. Many people don’t wire this up. If you wish to wire it up, the pin A at the reverse lockout solenoid needs a 12V ignition switched source, the B pin will run up to a ground controlled by the PCM. Different year PCM’s will vary, so you’ll want to check your pinouts to verify where to place it, or if it’s even supported for your PCM/ECM, I use the 12200411 PCM and it is supported and I do run the reverse lockout successfully.
The last wiring is the CAGS, I don’t know anyone who has gone through the trouble to wire this up. It is the computer aided gear selection. Basically, under certain circumstances it forces you to go from first gear, directly to 4th, GM implemented it to try and save gas from shifting less frequently in mild driving. If you don’t wire it up, it won’t be active and you can shift to whatever gear you want, when you want. The way God intended manual transmissions to be. I don’t know how to wire it up, so if you really want it, you’ll want to read up on how to do it.
You will need a PCM re-tune after the swap, the 4L60e has a 40 tooth speedometer reluctor ring, whereas the T56 uses a 17 tooth ring, so your speedometer will not be anywhere close to correct without retuning. Also your PCM will throw a bunch of "where the hell is your transmission" codes as well which can be fixed with the tune. An alternative to a retune is to make a custom 40 tooth reluctor ring like this:
But you would have to completely fabricate that yourself as I don’t know of any company that makes a 40 tooth conversion reluctor anymore. It would be far easier to just get a tune especially with OBDII trucks. Some of the earlier GMT400's may use a different way of utilizing the VSS signal from the trans, so you'll want to research that if you plan on doing the swap in a pre-96 setup, you may need some kind of signal converter like a dakota digital or something to get your speedometer to read correctly. I've never looked into that. If you get the PCM retuned, you will need it to be custom, the dealers will not be able to do this, and neither will any hand held programmers like the hypertech or anything like that. It has to be a fully custom tune. Some companies that offer custom tuning for OBDII vehicles include Blackbear performance, Wheatley performance, Nelson Performance, etc. There may also be some speed shops in your area that have the ability to if they have the correct software.
Now double check everything, make sure you bolted everything up, bleed the clutch if you haven’t already, check and make sure that the trans goes smoothly into each gear before starting the motor. Then start it up and go for a test drive. Remember that your new clutch needs to be broken in, so don’t hammer on it yet. Most clutches need to be driven sanely and with as much stop and go traffic as possible for the first ~500 miles. But follow your clutch manufacturer’s recommendations for that. If you rebuilt your trans it may be wise to change the fluid after the first 500 to a couple thousand miles.
One thing that should not be overlooked is due to the different transmission ratios here, you may need to re-gear your rear end to make full use of the T56, my 3.73's that I was running were just barely enough to work with but it made 6th gear practically un usable below 80mph, especially where I live which is a mountainous region. I re-geared to 4.88's which are just about right for my setup and geographical location, and I'll be able to make full use of every gear.
Now I personally went a step beyond just installing it and I opened up the steering column and removed the column gear selector for the 60e, and put on a manual truck column cover, I will also be blacking out the PDNR123 in the instrument cluster next time I have it off. You can do this stuff but it’s just cosmetic.
Here are some helpful sites with info and other similar write ups to help your research:
I have recently been shown this T56 modification write up, basically building a hybrid T56 from various stock parts that can handle upwards of 800-1000hp. This looks incredible and I may look into something like this when the rebuild time comes. The write up is geard towards LS1 T56's however the main differences between the LS1 and LT1 T56's are the midplate, bellhousing, and input shaft. I haven't done much more research on this other than reading some of this write up, but I believe this upgrade could easily be applied to an LT1 transmission without problems, afterall, the modification is built around the mainshaft and the LS1 and LT1 mainshaft are the same. Warning, this write up is a huge .pdf file in the area of 21MB, so if you're on a slow connection it may take a while:
http://www.eecis.udel.edu/~davis/z28/2010/100201_LS7T56/800-1000hp_rated_LS_Fbody_T56.pdf
60e to T56 Fbody swap write up
http://www.afrashteh.com/tranny_pics/T56.htm
T56 and LT1 torque specs:
http://www.texasfbody.org/TorqueSpecs/#T56
A big long thread on FSC about several of our swaps. Not exactly a write up, but has a lot of info in it:
http://www.fullsizechevy.com/showthr...swap-has-began
T56 rebuild parts and rebuilding services:
http://www.thegearbox.org/T56.html
http://www.ddperformance.com/
http://www.tick-performance.com/tickshift/
LT1 T56 clutch info and manufacturers:
http://www.specclutch.com/
http://www.mcleodracing.com/
http://www.fbody.com/lt1/274535
http://www.camaroz28.com/forums/showthread.php?t=520404
the official T56 service manual:
http://www.ttcautomotive.com/English...ice_Manual.pdf
Here's another great link, this company, Weir Hot Rod Products, makes a kit that will allow you to use practically ANY clutch setup with the LT1 T56. http://www.weirhotrodproducts.com/ the reason that is so cool is because the LT1 T56 with its odd ball pull style clutch we are very limited on the clutch setups out there. And since the LT1 has been superseded by the LSx, not many people are looking to make the clutch setup better. With the Weir it allows you to use a regular push style clutch setup and you have TONS more options available. I'd love to get one, depending on the cost, that may be what I go with next time I have to change the clutch disc.
To comment, discuss, or ask questions about this article, please click here to visit our forum.